So, you finally upgraded from a Grid/Shared server and moved to a Dedicated Virtual (dv) server. MediaTemple sure knows how to entice people with their fancy graphics and awesome looking server images. Now, I know you didn't purchase this server just because of the pretty graphics, or perhaps you did... It's so SHINY!

Your reason for purchasing this server is irrelevant; because you've made a good choice. So, now it's time to get to know your shiny new Dedicated Virtual (dv) server. Below are three topics we will be going over to make you better aquainted with your DV server. First, we'll start off by describing a Dedicated Virtual Server followed by features and benefits, and finally we'll go over accessing your Control Panel.
What is a Dedicated Virtual Server?

The MediaTemple data center is located in Los Angeles, CA. In this data center their are tons of racks containing thousands of servers or computers. When a user goes to your website from their computer, your server is contacted and fetches the website information which gets delivered to the users browser. You don't physically get to see your server, but you can visualize a server/CPU sitting on the rack in the MediaTemples data centers. Now, the reason it is a virtual server is because you do not actually own a single server in that data center; however, you have been dedicated and own the resources of one machine, the RAM, hard drive space, and your own computer instance.

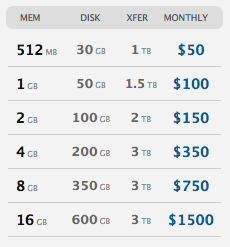
If you were previously on a grid/shared hosting, your websites would be competing for resources with other users websites, causing for slower load time and some bottleneck. But since you have a Dedicated server, your website does not have to compete with all the other websites. You are promised the resources you are currently paying for, you can see an example of MediaTemples (dv) price points to the right. So, if you purchased the first tier of this dedicated virtual server you will always have 512 MB Ram, 30G space dedicated specifically for your web applications. If it makes it easier to understand that you own a single server on the rack, then that is perfectly okay. After all, it's virtual right? In fact you can even imagine that your single shiny server is surrounded by armed guards, kept under constant watch, and treated like a god. You can feel free to elaborate further with your own imagination. Now that you get the basic understanding of what your virtual server is, we'll move on to telling you the features and benefits of your server.
Features and Benefits of your (dv) server
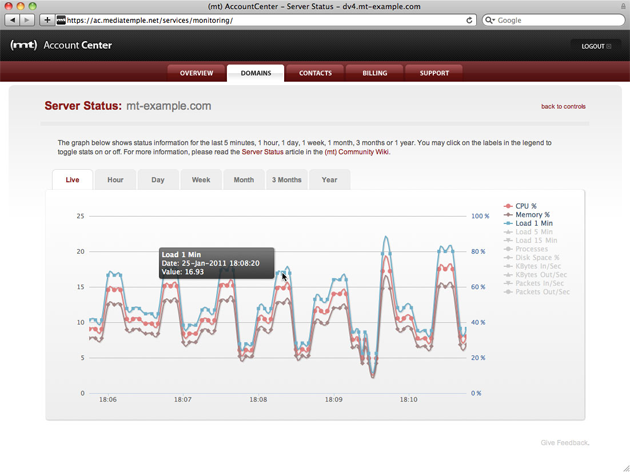
There are several benefits and features included with your server. A few top features include the capability to install any application, real-time server status, rebooting/repairing your server, and easy scalability. With a dedicated virtual server you can install any application on your web server. Most servers already support PHP and many other server-side scripting languages. But what if you wanted to install Ruby on Rails? Well, luckily enough, you have root access to your server so you can feel to get on board with Rails. It's your machine, so install what you want. You'll also get real-time analytics about your server use. You can monitor your server RAM, hard drive space, and any other activity that is going on with your computer. And like a real computer you have the options to reboot, re-install, or repair your server. Yeah, it's a virtual machine but you still have a separate instance of your cpu which allows you to restart the operating system and free up all your server resources.

Lastly, the (dv) server is made to scale. When you start off, you'll probably purchase the first tier of the (dv) server, and then as your application starts to build steam you can easily upgrade to one of the higher tiers with the click of a button. So, if you get a notification that your server has been reaching 90% of it's resources due to a high spike in traffic (usually more traffic is always a good thing), you can easily log-in to your Control Panel and click 'upgrade' and choose the tier of your liking. I hope with the features and benefits listed above you're very happy with your purchase. Next, we'll briefly discuss your MediaTemple Control Panel where you can change settings, add domains and databases, and much more.
Your Server Control Panel
After you purchase your new server, you'll receive multiple emails containing links on how to log-in to your new account. You will log-in to your media temple Control Panel by going to:
https://ac.mediatemple.net/login.mt.
After you log-in you will be in your Control Panel or Account Center, which looks similar to the following:

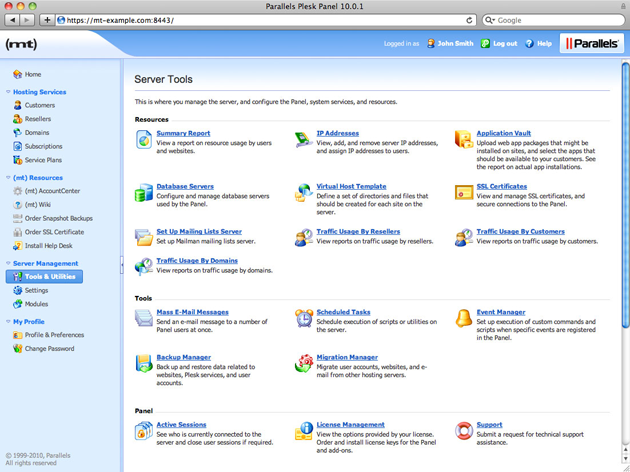
In the account center you will be able to view your server basic information and overview, add/edit/delete new domains and view statistics, add new users to your account, edit billing information, access support, and much more. The Account Center is where yourself and other users can do basic operations for your (dv) server. If you are the server admin and you wish to do more advanced operations such as set-up reseller accounts, e-mail accounts, and add DNS entries, you'll want to log-in to the Plesk application which you can get to from clicking on the 'Plesk' button in your Account Center Overview. Your Plesk administrative Control Panel will look similar to the following:

That's the basics about accessing your Account Center and Control Panel. For more information on using and managing your new server you can refer to the MediaTemple Knowledge Base. There you go. You've just learned the basics of getting to know your new MediaTemple (dv) server. Now, that you have a basic understanding of your new server, it's time to put it to use. So go out and build your revolutionary new web app.
